[vc_row 0=””][vc_column 0=””][vcex_heading text=”Delta Go Trade-In Offer” font_family=”Open Sans” text_align=”center” font_weight=”semibold” css=”.vc_custom_1496896832021{margin-top: 30px !important;margin-bottom: 30px !important;}”][vc_single_image image=”2612″][/vc_column][/vc_row][vc_row][vc_column 0=””][vc_row_inner 0=””][vc_column_inner 0=””][vc_column_text 0=””]After iterating numerous prototypes and perfecting the Delta Go upgrade for six months, we have finished production on the next generation of the Delta Go 3D Printer. The new model is faster, more precise and offers improved print results with the new blower fan.
While other companies may offer upgrades to their past customers at an additional cost, we at Deltaprintr believe our customers are the foundation of our business and should have the full experience of the next version of the Delta Go model. That is why we are offering a trade-in for all past and current Delta Go owners who purchased their printer before April 1, 2017. This includes both online and trade show purchases.[/vc_column_text][vc_message message_box_color=”warning” css=”.vc_custom_1496897809773{margin-top: 50px !important;}”]Please note that the trade-in offer expires end of July, 2017. Starting August 1, 2017 we will no longer accept new trade-ins for the upgrade.[/vc_message][/vc_column_inner][/vc_row_inner][vc_column_text]The trade-in consists of shipping your current hotend back to us for a full replacement. If you are interested in acquiring the new upgrade for free of charge, please carefully read and follow the instructions below:
Step 1
Place an order for the upgrade here. The upgrade is free. This is only for the shipping costs to send it to you.
Step 2
Before you remove your hotend, please clean the brass tip from any gunk or plastic residue. You will need to heat up the hotend to do this. Be careful to not burn yourself – use paper towel or tweezers!
After you’ve cleaned the brass tip, unplug the power from the printer and pull the red sleeve off while it’s still hot using tweezers so you do not burn yourself. (if your thermistor falls out, that is ok. Do not attempt to push it back into the nozzle or you may end of fraying the ends of the sleeving. If it doesn’t fall out, leave it inside).
We ask of you to remove the red sleeve while the hotend is still hot in case it gets “glued” to the heater due to plastic residue.
Keep your printer powered off for the rest of the instructions.
Step 3
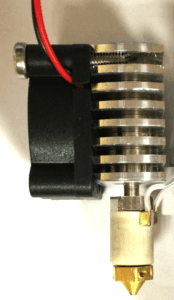
Remove your current hotend from the metal platform by unscrewing the two screws that hold the heatsink to the metal platform. Also disconnect the thermistor, heater, fan connections and unscrew the 3mm tube push-fit from the heatsink. The image below is a representation of what you will be shipping to us, which includes the heatsink, heat-break, heater, nozzle, thermistor and fan.
Step 4
(please no hand written notes – makes it easier and quicker for us to process your return)
Online Purchases – Print out the following information. Also You can check this under your account.
First & last name:
Delta Go 3D Printer order number:
Number of printers to upgrade:
Order number for upgrade purchase:
Trade Show Purchases – If you purchased your printer at a show, in person, print the following information.
First & last name:
Show name:
Number of printers to upgrade:
Order number for upgrade purchase:
If you received your printer as a gift from someone else, please ask that person for this information. If you send us your hotend without this information, we will not process a trade-in for your upgrade and will require you to pay shipping to have it sent back.
Step 5
Carefully package your hotend and your order note. We recommend using USPS flat-rate padded envelopes (available for free at any USPS location in the USA).
Ship it to the following address:
Deltaprintr
71 Victory Boulevard
Staten Island, NY 10301
Note: As our policy, we do not accept drop-offs or pickups. All of our packages are re-routed to our warehouse. Please allow us 1-2 weeks to process your return and get the new upgrade shipped out to you. A tracking number will be emailed to you once your upgrade is shipped. You must have already placed the order for the upgrade as specified in step 1 above, prior to shipping your hotend back to us.
[/vc_column_text][/vc_column][/vc_row][vc_row][vc_column][vc_message color=”warning” message_box_color=”warning” icon_fontawesome=”fa fa-exclamation-triangle”]STOP HERE UNTIL YOU RECEIVE YOUR UPGRADE. [/vc_message][/vc_column][/vc_row][vc_row][vc_column][vc_column_text]
Step 6
Follow the video below to install your new upgrade. If you need help, please feel free to use our community forums. Please note that you MUST purchase separately Super Lube Synthetic Grease and Threadlocker Blue (medium – high strength recommended) for use during assembly.[/vc_column_text][/vc_column][/vc_row][vc_row][vc_column][vc_message color=”warning” message_box_color=”warning” icon_fontawesome=”fa fa-exclamation-triangle”]Do NOT substitute other lubricants such as using oil instead of synthetic grease. We have tested Super Lube and it works best. Other lubricants such as oil do not work. They will wear down the plastic parts and shorten their life span.[/vc_message][vc_message color=”warning” message_box_color=”warning” icon_fontawesome=”fa fa-exclamation-triangle”]We recommend you watch the video at least once prior to starting assembly so you become familiar with it and don’t accidentally damage the parts. The Delta Go upgrade is not covered under our standard warranty guidelines.[/vc_message][vc_row_inner][vc_column_inner][vc_video link=”https://youtu.be/DnI3B8vGqqI” align=”center”][/vc_column_inner][/vc_row_inner][/vc_column][/vc_row][vc_row][vc_column][vc_column_text]
Step 7
Install the new Cura 2 available on our support page and choose the Delta Go from the list under “Other Printers”.
NOTE: Unlike the old Cura 1, the new Cura 2 does not support printing via USB yet. You will have to save files to the MicroSD card and print from there. Either by starting the print via pronterface by sending play /sd/prints/FILENAME.gcode command or by saving the file on the MicroSD card as on_boot.gcode in the root folder (not the prints folder). If you wish, you may continue to use the old Cura 1. We recommend you use Cura 2 for slicing as the results are significantly better than Cura 1.
Step 8
Next you will need to update your firmware/config and re-run the factory setup to auto-tune the new hotend’s heater.
- Power off your printer and plug the MicroSD card to your computer.
- Delete ALL the files on your MicroSD card.
- Download the Micro SD card files from our support page and copy/paste all the files inside of the zip folder onto the MicroSD card.
- Safely eject the card from your computer, plug the MicroSD card into your printer and power it on. The printer will take a few minutes (no more than 3 minutes) to power on as it flashes the new firmware onto the board. Once it’s done flashing, the lights will turn on. If it takes longer than 3 minutes, unplug the power and replug it back in to try again. The firmware.bin file should have now been renamed to FIRMWARE.CUR by the printer. This means the firmware was successfully flashed onto the printer.
- Next you will need to run the factory_setup.gcode file. This will auto-calibrate and auto-tune the heater. Make sure your hotend is clean so the tip can make contact with the bed (you can check if the tip is clean with
M119first – recommended). Sendplay /sd/factory_setup.gcodeto start the process. Be prepared to un-plug your printer in case the tip crashes into the bed due to not being clean enough.This process will take about 5 minutes. Your printer will first auto-calibrate and then after it homes, it will sit idle while it cycles the heater through various temperatures (do not touch the hotend!). After it is done tuning the heater, the lights will turn green to signal that the factory_setup.gcode file has finished. You can click the blue button on the side of the printer to “reset the power” so the lights turn back to white. Congrats! You may now start printing! We recommend watching the printer for the first time to make sure everything was installed and done properly.
F.A.Q.
Why do we have to ship back our current hotend?
Our Mini Hotend’s heaters are custom made and are therefore very expensive to produce. We will be retrofitting them on your new hotend that also includes a new brass tip, heat break and heatsink. Your current thermistor will also be used on the new hotend.
Can I just retrofit it myself and save you the hassle?
Unfortunately it is not that simple to do and attempting to do so may result in you breaking the heater (because it is ceramic) or causing other damage to the hotend, which is a safety issue for us. Better to avoid the frustration and allow our experts to do it.
I’m an international customer, will I have to pay import duties?
Since this upgrade is free, it will be marked according to the price you pay for it, which is $0. It is up to your own country’s customs office to determine if they should apply any taxes, fees or import duties. Deltaprintr has no control over this and cannot provide any estimates as it varies from country to country. If you have questions regarding import duties, please contact your local customs office.
When you ship it back to us, please be sure to mark it as a gift so Deltaprintr is not liable for import duties.
What are we receiving for the new upgrade?
All of the necessary parts (a $85 value!). This includes new aluminum arms, screws, stainless steel balls, plastic parts, fan, etc. Some assembly is required as demonstrated in the video above. A new firmware will also need to be loaded to accommodate the change of your printer’s dimensions (available on our support page). The build volume height will increase to 6 inches (154mm).
Once again, we thank you for choosing Deltaprintr and we hope you will enjoy this free upgrade. If you have any feedback you would like to provide, please get in touch with us! Please share with us your newly installed upgrade on Facebook, Instagram or Twitter with the hashtag #DeltaGo or tag us![/vc_column_text][/vc_column][/vc_row]